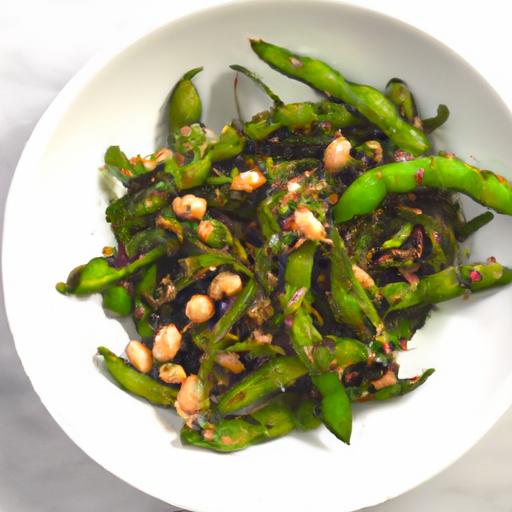
Crispy & nutritious, air fryer roasted edamame offers a delightful, health-conscious snack that satisfies cravings while fueling your body with essential nutrients. With its Japanese origins rooted in simple edamame pods boiled and salted as a traditional appetizer, roasting these vibrant green soybeans in the air fryer elevates their texture to an irresistibly crunchy treat. This method preserves their rich, nutty flavor and enhances their natural protein-packed power, making it perfect for anyone seeking a wholesome snack.
Prep and Cook Time
- Preparation: 5 minutes
- Cooking: 12 minutes
- Total Time: 17 minutes
Yield
Serves 2-3 as a snack
Difficulty Level
Easy
Ingredients
- 1 cup frozen edamame pods, thawed and patted dry
- 1 tablespoon olive oil or avocado oil
- 1 teaspoon sea salt
- ½ teaspoon smoked paprika (optional for smoky depth)
- ½ teaspoon garlic powder
- Freshly ground black pepper to taste
- Optional garnish: toasted sesame seeds or finely chopped chives
Instructions
- Preheat your air fryer to 375°F (190°C) to ensure that the edamame will crisp evenly and quickly.
- In a medium bowl,toss the thawed edamame pods with the olive oil to coat evenly. This helps achieve golden edges and enhances flavor absorption.
- Sprinkle the sea salt, smoked paprika, garlic powder, and black pepper over the pods. Toss again to distribute the seasoning uniformly.
- Transfer the seasoned edamame into the air fryer basket in a single layer,avoiding overcrowding for maximum crispiness.
- Air fry for 12 minutes, shaking the basket halfway through cooking to ensure even roasting and prevent burning.
- Check for a vibrant green color with crispy edges; if you prefer even crunchier pods, add 2-3 more minutes, watching closely.
- Remove the edamame carefully from the air fryer and promptly transfer to a serving bowl. Garnish with toasted sesame seeds or chives if desired.
Benefits of Choosing Air Fryer Edamame for healthy Snacking
Opting for air fryer roasted edamame is a brilliant choice for anyone prioritizing nutrition and flavor. These little green powerhouses are not only rich in plant-based protein and fiber, but roasting them in an air fryer requires minimal oil, resulting in lower fat content compared to traditional frying.
They provide sustained energy and essential amino acids, making them ideal for pre- or post-workout snacks. Additionally,edamame contains antioxidants and vitamins such as folate and vitamin K,supporting overall well-being. Thanks to the fast, even cooking that air fryers deliver, you get a crispy texture without sacrificing the natural freshness or nutrients, allowing you to snack smart while enjoying every bite.
Flavor Variations to Elevate Your Roasted Edamame Experience
Transform your air fryer roasted edamame into a flavor adventure by experimenting with a variety of spice blends and finishing touches. Try tossing the pods with zesty lemon zest and chili flakes for a refreshing heat or mix in nutty nutritional yeast with smoked paprika to create a savory “cheesy” flavor without dairy.
For an Asian-inspired twist, coat the edamame lightly with sesame oil post-roasting, then sprinkle with furikake seasoning or a dash of soy sauce and toasted sesame seeds just before serving. Another exciting option is a curry powder and cumin mix to bring warmth and depth. These flavor tweaks ensure your air fryer roasted edamame never gets boring and cater to diverse palates seamlessly.
Step by Step Guide to Perfectly Crispy Edamame Every Time
Achieving perfect crispness involves a few culinary secrets. Make sure your edamame pods are well dried to prevent steaming in the air fryer, which can leave them soggy. Preheating the air fryer and shaking the basket halfway through ensures even heat circulation.
Use a light coating of oil to help spices adhere and promote a golden finish. Keep the pods in a single layer, avoiding crowding, which steams rather of crisps. watch the last few minutes closely to pull them out at your preferred crunch level. These deliberate but easy steps make sure you enjoy that unbeatable crispy-and-tender balance every time.
Tips for Storing and serving Your Air Fryer Edamame Creations
Store leftover air fryer roasted edamame in an airtight container at room temperature for up to 2 days to retain maximum crunch. To refresh them, reheat in the air fryer for 3-4 minutes at 350°F to bring back that crisp exterior. Avoid refrigerating as it can introduce moisture and soften the pods.
Serve your crispy edamame warm or at room temperature as a standalone snack, paired with a tangy dipping sauce like soy-ginger or spicy sriracha mayo, or as a vibrant garnish atop salads and grain bowls to add texture and protein. For elegant entertaining, present in a rustic wooden bowl garnished with fresh herbs and a wedge of lemon for an inviting snack station.

| Nutrient | Amount per 1 cup |
|---|---|
| Calories | 190 kcal |
| Protein | 18 g |
| Carbohydrates | 14 g |
| Fat | 8 g |
For those excited to explore more nutrient-dense snacks, check out our guide on healthy roasted chickpeas recipes for additional inspiration.
Q&A
Q&A: Crispy & nutritious – Easy Air Fryer Roasted Edamame Recipes
Q1: What makes edamame a great snack choice?
A1: Edamame, young soybeans still in the pod, are packed with protein, fiber, and essential nutrients like iron and calcium. They’re a naturally gluten-free, low-calorie snack that fuels your body and keeps cravings at bay. Plus, their subtly sweet, nutty flavor delights the palate without overpowering it.
Q2: Why use an air fryer for roasting edamame?
A2: The air fryer is a game-changer for edamame lovers. It crisps the pods perfectly without drowning them in oil, making your snack both crunchy and healthy. The circulating hot air ensures even roasting,cutting cooking time dramatically and keeping your kitchen cool-no oven heat waves hear!
Q3: How do you prepare edamame for air frying?
A3: Start with fresh or thawed shelled or in-pod edamame. Toss them lightly with a touch of olive oil or your favorite cooking oil, then season with salt or other spices. The oil helps achieve that irresistible crispy texture while the seasoning amps up the flavor profile.
Q4: What are some easy seasoning ideas for air fryer roasted edamame?
A4: The sky’s the limit! Classic sea salt and cracked black pepper is always a winner. Feeling adventurous? Try garlic powder and smoked paprika for a smoky kick, chili-lime zest for a tangy twist, or a sprinkle of nutritional yeast for a cheesy, umami boost.Sweet tooth? Dust with cinnamon and a pinch of sugar for a unique sweet-savory combo.
Q5: How long should you air fry edamame to get that perfect crunch?
A5: Generally, 10 to 12 minutes at 375°F (190°C) does the trick. Shake or toss the basket halfway through cooking to ensure every bean gets evenly roasted. Keep an eye on them towards the end-onc they turn golden and crispy, they’re ready to enjoy!
Q6: Can I use frozen edamame, or do I need fresh?
A6: Frozen edamame works beautifully and is often the most convenient choice. Just thaw and dry them off if needed before seasoning and air frying.this makes air fryer roasted edamame a rapid, year-round snack option!
Q7: Is air fryer roasted edamame suitable for special diets?
A7: Absolutely! It’s naturally vegan, gluten-free, and low in carbs, making it perfect for those following plant-based, keto, or paleo lifestyles (double-check seasoning ingredients, just in case). It’s also a terrific protein-rich snack for athletes or anyone wanting to maintain balanced nutrition.
Q8: Any tips for serving or storing air fryer roasted edamame?
A8: Serve them warm for maximum crunch alongside your favorite dips, or scatter over salads for texture. To keep leftovers crisp, let them cool completely, then store in an airtight container at room temperature-but best enjoyed the same day for optimal crunch and flavor.
Q9: Can kids enjoy air fryer roasted edamame?
A9: Definitely! The mild, nutty taste and fun “pop” of roasted edamame make it a kid-friendly snack.Just watch the seasoning levels-keep it mild and salt-light for little palates and encourage them to try this nutritious alternative to chips and crackers.
Q10: Any creative recipe twists using air fryer roasted edamame?
A10: How about crushing crispy roasted edamame into a crunchy salad topping? Or tossing them into grain bowls for extra protein and texture? Blend them with herbs and olive oil for a unique, protein-packed edamame pesto. The combination of nutrition and crunch lends itself to exciting culinary creativity!
Embrace the simplicity and wholesome goodness of air fryer roasted edamame-your new go-to snack for a crispy, guilt-free delight!
The Conclusion
From a humble pod to a crunchy, flavorful snack, air fryer roasted edamame proves that nutritious can be tasty-and delightfully easy. Whether you’re fueling up for a busy day or craving a guilt-free treat, these recipes transform simple ingredients into crispy bites packed with protein and zest.So next time hunger strikes, reach for your air fryer and enjoy a tasty twist on a wholesome classic.your taste buds-and your body-will thank you.
Cheese & Turkey Roll-Ups are an irresistibly flavorful snack that blend creamy, savory cheeses with tender, smoky turkey slices for an easy bite packed with unforgettable taste. This versatile dish traces its roots to american deli traditions,but with a creative edge,you can personalize each roll-up to suit your palate or occasion perfectly. Whether whipped up for a casual lunch, elegant appetizer, or a no-fuss party platter, these roll-ups are guaranteed to impress.
Prep and Cook Time
Prep Time: 15 minutes | Cook Time: 0 minutes | Total Time: 15 minutes
Yield
Makes 12 roll-ups (serves 4 as an appetizer)
Difficulty Level
Easy
Ingredients
- 12 slices thinly sliced turkey breast (smoked or roasted)
- 6 oz cream cheese, softened
- 4 oz sharp cheddar cheese, shredded
- 1 tbsp fresh chives, finely chopped
- 1 tsp smoked paprika
- 1 tbsp Dijon mustard
- 1/2 cup baby spinach leaves, washed and patted dry
- 1/4 cup toasted walnuts, chopped (optional for crunch)
- Fresh cracked black pepper, to taste
- 1 tbsp honey (for drizzle, optional)
Choosing the perfect Cheese and Turkey Combinations for Maximum Taste
To elevate your cheese & turkey roll-ups, the interplay between the smoky richness of turkey and the cheese’s creaminess is key. Classic pairings like sharp cheddar or tangy Havarti complement turkey’s mild flavor wonderfully, while goat cheese or ricotta offer a luscious, tangy twist. An adventurous palate might opt for blue cheese for boldness or Swiss for a nutty undertone. Mixing textures enhances interest: smooth cream cheese combined with shredded cheeses yields both creaminess and bite. When selecting your turkey, opt for high-quality slices without added sugars or fillers and consider smoked varieties for a deeper, more complex profile. Fresh herbs like chives or thyme introduce shining notes that awaken your roll-ups with aroma and colour.
Creative Twists and Flavor Enhancers to Elevate Your Roll-Ups
Add dimension to these roll-ups by infusing your cream cheese spread with a dash of dijon mustard or a sprinkle of smoked paprika to awaken richness. Incorporate finely chopped nuts, such as toasted walnuts or pecans, for satisfying crunch. For a subtle sweetness contrast, drizzle a little honey or layer thin slices of crisp apple inside prior to rolling. Fresh greens like peppery arugula or spinach leaves add freshness and color, brightening the overall texture. For a Mediterranean vibe, try adding sun-dried tomatoes and basil or swap cheddar for crumbled feta.Don’t shy away from a splash of hot sauce or a pinch of cayenne if you prefer a slight kick – balance is the secret!
Step-by-Step Preparation Tips for Quick and Mess-Free Assembly
- Prepare your spread: In a bowl, combine softened cream cheese, shredded cheddar, chopped chives, Dijon mustard, smoked paprika, and freshly cracked pepper. Mix until smooth and well integrated. This rich base is the flavor anchor of your roll-ups.
- Lay out turkey slices: Arrange each turkey slice flat on a clean cutting board or parchment-lined surface. This prevents sticking and keeps your workspace tidy.
- spread evenly: Using a butter knife or offset spatula, spread about 1 tablespoon of the cheese mixture evenly over each turkey slice, leaving a small border for easy rolling. Consistency in spreading ensures each bite is balanced.
- Add fillings: Place a small handful of baby spinach or arugula on the cheese, sprinkle chopped toasted walnuts (if using), and layer thinly sliced apple or other desired fresh additions.
- Roll tightly: Starting at one short edge, roll each turkey slice firmly but gently to avoid tearing. Using parchment paper to help guide rolling can keep hands clean and speed the process.
- Slice and chill: For neat bite-sized pieces, slice each roll-up diagonally into 2-3 pinwheels. Arrange on a platter and refrigerate for 10-15 minutes to firm up for effortless serving and less mess.
Serving Suggestions and Pairings to Impress Your guests
Present these elegant cheese & turkey roll-ups on a sleek wooden board garnished with sprigs of fresh herbs like thyme or rosemary for an earthy aroma. Accompany with a small ramekin of whole-grain mustard or a tangy cranberry chutney to offer bright contrast. Add colorful accompaniments like cherry tomatoes and crisp cucumber ribbons for refreshing bites.For beverage pairings, a dry white wine such as Sauvignon Blanc or a crisp, light lager balances the creamy richness and smoky turkey flavors beautifully. To enhance presentation,thread roll-ups onto small skewers or cocktail picks,making them perfect,mess-free finger foods for your next gathering.
Tips for Success
- Use room temperature cream cheese for easy mixing and smooth spreading.
- Don’t overfill the turkey slices-to much stuffing can make rolling tricky and messy.
- Chill roll-ups briefly before slicing to ensure clean cuts and firm shape.
- Try swapping fresh herbs seasonally – dill or basil create delightful variations.
- Make ahead by assembling and storing in an airtight container up to 24 hours; add fresh greens right before serving to keep crisp.
| Nutrient | Per Serving (3 Roll-Ups) |
|---|---|
| Calories | 220 kcal |
| Protein | 19 g |
| Carbohydrates | 4 g |
| Fat | 14 g |
For more creative roll-up ideas, check out our Healthy Wrap Recipes section. Learn about the science of perfect cheese pairings on Cheese Science Institute.

Q&A
Q&A: Cheese & Turkey Roll-Ups – Easy Bites Packed with Flavor
Q1: What makes Cheese & Turkey roll-Ups such a popular snack?
A1: Cheese & Turkey Roll-Ups strike the perfect balance between simplicity and flavor. They’re effortless to prepare, requiring minimal ingredients and no cooking, which makes them an ideal go-to for a quick bite. plus, the combination of smoky turkey and creamy cheese creates a delightful taste experience that’s both satisfying and nutritious!
Q2: Can I customize the ingredients to suit my taste or dietary needs?
A2: Absolutely! The beauty of these roll-ups lies in their versatility. Swap the turkey for chicken or ham, switch out cheddar for mozzarella or a tangy goat cheese, or even add fresh veggies like spinach, bell peppers, or avocado slices. For a low-carb or keto-friendly snack, this recipe works perfectly as is. feel free to get creative with spices,herbs,or even a drizzle of honey mustard for an extra flavor kick.
Q3: How do you ensure the roll-ups stay fresh and don’t unravel?
A3: To keep them neat and sturdy, lay the cheese slice evenly over the turkey, then roll tightly but gently.If you’re preparing ahead, wrapping each roll-up individually in plastic wrap or storing them in an airtight container helps maintain freshness and shape. For an extra hold, toothpicks can be your best friends!
Q4: Are Cheese & Turkey Roll-Ups healthy?
A4: Yes! These roll-ups are packed with protein, which helps keep you full and energized. They’re also low in carbs and can be made with whole-food ingredients. Opting for nitrate-free turkey and natural cheeses can boost the nutritional value even further. They’re a perfect snack for busy days, providing fuel without the crash.
Q5: Can Cheese & Turkey Roll-Ups be served beyond just snacks?
A5: Definitely! While they shine as quick snacks or appetizers, these roll-ups can also star in lunchboxes, party platters, or even light dinners when paired with a vibrant salad or fresh fruit. They’re the ultimate multitaskers in the kitchen-a bite-sized burst of flavor whenever you need it.
Q6: What’s the best way to serve these roll-ups for parties or gatherings?
A6: presentation is key! Arrange the roll-ups on a colorful platter, maybe alongside dipping sauces like ranch, honey mustard, or a zesty aioli. Garnish with fresh herbs-think parsley or chives-to add a pop of color.For an eye-catching display, stack them pyramid-style or thread them onto skewers for an easy grab-and-go option.
Cheese & Turkey Roll-Ups combine convenience and taste in every bite,proving that simple ingredients can create standout snacks. So roll up, dig in, and savor every flavorful moment!
To Wrap It Up
whether you’re gearing up for a quick lunch, hosting a casual get-together, or simply craving a snack that hits all the right notes, these Cheese & Turkey Roll-Ups deliver a delightful punch of flavor without the fuss. Easy to assemble and endlessly adaptable, they prove that simple ingredients can create something truly satisfying. So next time you wont a bite that’s both convenient and delicious, remember-sometimes the best culinary adventures start with a humble roll-up. ready, roll, and savor!

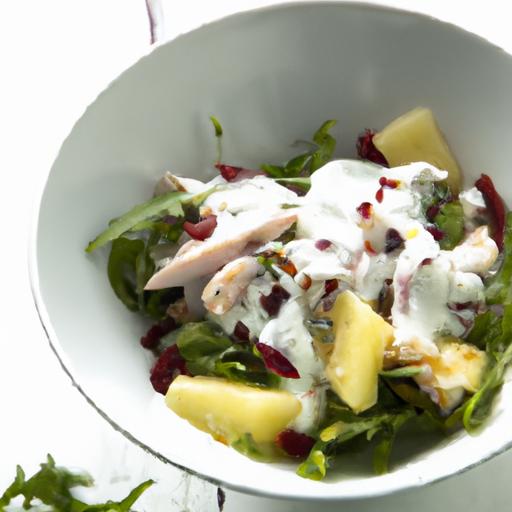
Fresh & Fit: Easy Healthy Chicken Salad with Greek Yogurt brings together the perfect balance of creaminess and tang, transforming a classic dish into a wholesome, protein-packed delight. This salad highlights the incredible nutritional benefits of Greek yogurt, a dairy superstar known for its rich probiotics, high protein content, and low fat. Originating from Mediterranean traditions, this refreshing chicken salad is a testament to light, vibrant flavors with maximum health impact-making it an ultimate go-to for nourishing lunches or light dinners.
Prep and cook time
- Preparation: 15 minutes
- Cooking: 20 minutes (for poaching or roasting chicken)
- Total Time: 35 minutes
Yield
Serves 4 generous portions
Difficulty Level
Easy – perfect for busy weekdays or beginner cooks seeking fresh, healthy meals
Ingredients
- 2 cups cooked chicken breast, shredded or diced
- 1 cup plain Greek yogurt (preferably whole or 2% fat for creaminess)
- 1/4 cup celery, finely chopped
- 1/4 cup red grapes, halved
- 1/4 cup toasted walnuts, roughly chopped
- 2 tablespoons fresh parsley, chopped
- 1 tablespoon fresh lemon juice
- 1 teaspoon Dijon mustard
- 1/2 teaspoon garlic powder
- Salt and black pepper, to taste
Instructions
- Cook the chicken: Poach your chicken breasts in simmering water with aromatics like bay leaves or peppercorns for around 15 minutes, until the juices run clear. Let cool before shredding or dicing finely.
- Prepare the dressing: In a medium bowl, combine Greek yogurt, fresh lemon juice, Dijon mustard, garlic powder, salt, and black pepper.Whisk until silky smooth and well blended.
- Combine ingredients: Gently fold the shredded chicken, celery, grapes, walnuts, and parsley into the yogurt dressing, ensuring every bite is coated evenly without breaking the grapes.
- Chill for flavor melding: Cover and refrigerate the salad for at least 30 minutes. This rest allows the flavors to harmonize and the texture to become perfectly creamy and light.
- Final taste test: Adjust seasoning with extra salt, pepper, or lemon juice if needed before serving.
Chef’s Notes and Tips for Success
- Opt for free-range or organic chicken to maximize flavor and nutritional value.
- Greek yogurt not only replaces traditional mayonnaise here but adds probiotics that support gut health-choose full-fat varieties for richness or low-fat for a lighter option.
- Grapes can be swapped for dried cranberries or apple chunks depending on your preferred sweetness.
- Toast walnuts ahead of time to deepen their nutty aroma; serve extra on the side for crunch.
- For dairy-free adaptations, try swapping Greek yogurt for a high-quality coconut yogurt or a homemade cashew cream.
- Make-ahead pleasant: The salad keeps well for 2 days refrigerated but avoid adding delicate greens until serving to maintain freshness.
Serving Suggestions
Serve your Fresh & Fit: Easy Healthy Chicken Salad with Greek Yogurt over vibrant leafy greens like baby spinach or arugula for a colorful plate. Spoon atop toasted whole-grain bread or stuff inside a pita pocket for a nourishing lunchbox idea. Garnish with extra parsley sprigs, a lemon wedge, and a sprinkle of cracked black pepper. A fresh cucumber salad or a side of crisp carrot sticks pairs beautifully to keep the meal light and crisp.

Nutritional Information per Serving
| Calories | Protein (g) | Carbs (g) | Fat (g) |
|---|---|---|---|
| 320 | 38 | 10 | 8 |
For a deeper dive into Greek yogurt’s health benefits, visit Medical News Today. To explore more nourishing recipes using lean proteins, check out our Healthy Grilled Chicken Ideas.
Q&A
Q&A: Fresh & Fit – Easy Healthy Chicken Salad with Greek Yogurt
Q: What makes this chicken salad recipe different from the traditional versions?
A: Unlike classic chicken salads that often rely on heavy mayonnaise,this recipe swaps in creamy Greek yogurt. the result? A lighter, tangier salad that’s packed with protein and probiotics, making it a fresh and fit-friendly twist on a timeless favorite.
Q: Why use Greek yogurt instead of regular yogurt or mayo?
A: Greek yogurt is thicker and creamier than regular yogurt, which helps it mimic the rich texture of mayo without the extra calories or fat. Plus, it’s loaded with probiotics that support digestion and immune health, turning your chicken salad into a nutritious powerhouse.
Q: Can I customize this salad to suit different tastes or dietary needs?
A: Absolutely! This recipe is incredibly versatile. Swap chicken for turkey or tofu for a plant-based boost. Add crunchy veggies like celery or bell peppers for extra fiber, or toss in some nuts and dried fruits for a sweet, satisfying crunch. The creamy Greek yogurt base plays well with many flavor profiles.
Q: Is this salad meal-prep friendly? how long does it last?
A: Yes, this salad is perfect for meal prep! Store it in an airtight container in the fridge, and it should stay fresh for up to 3 days. The Greek yogurt helps maintain moisture without becoming overly soggy, keeping every bite tasty and fresh.
Q: What are the key health benefits of using Greek yogurt in this salad?
A: Greek yogurt is high in protein, low in fat, and rich in calcium and probiotics. This combination supports muscle repair, bone health, and gut wellness. By replacing mayo with Greek yogurt, you reduce saturated fat intake while still enjoying a creamy, satisfying salad.
Q: How do I make sure the chicken salad stays fresh and flavorful?
A: Use freshly cooked or rotisserie chicken for the best taste, and mix the salad just before serving if possible to keep the veggies crisp. Adding a squeeze of lemon juice can brighten flavors and help preserve freshness, while freshly chopped herbs like dill or parsley add vibrant notes.
Q: Can I eat this chicken salad warm or is it only meant to be served cold?
A: This salad is traditionally served chilled, making it a refreshing meal on warm days. However, if you prefer, you can serve the chicken warm and spoon the Greek yogurt dressing on the side for dipping. Either way, it’s appetizing!
Q: What sides or bread pair well with this healthy chicken salad?
A: Since this salad is protein-rich and creamy, it pairs beautifully with crunchy whole-grain bread, crisp lettuce wraps, or even a bed of quinoa or brown rice for a more filling meal. Toss in a colorful side salad or fresh fruit for a balanced plate.
This Q&A explores the freshness, health benefits, and versatility behind an easy greek yogurt chicken salad, inviting readers to rethink a classic with a nutritious, flavorful upgrade!
Insights and Conclusions
this Fresh & Fit Chicken Salad isn’t just a meal-it’s a festivity of wholesome simplicity. By swapping mayo for creamy Greek yogurt, you’re inviting a burst of protein and tangy goodness that transforms a classic dish into a vibrant, healthful delight.Whether you’re packing lunch for a busy day or seeking a quick,nourishing dinner,this easy recipe proves that eating well doesn’t have to be complicated. So go ahead, whip up this fresh and fit salad, and savor the satisfying balance of flavor and nutrition in every bite. Your body-and taste buds-will thank you.
Power Up Your Snack time with a simple yet satisfying protein-packed mug cake that not only fuels your body but also delights your taste buds. Incorporating protein into your snacks enhances muscle repair, increases satiety, and keeps energy levels steady between meals. This recipe transforms the humble mug cake into a powerhouse of nourishment, perfect for busy days or post-workout refueling.
Benefits of Adding Protein to Your Snack Time
Protein is essential for building and repairing tissues, supporting immune function, and maintaining overall metabolic health. Adding protein to your snack helps curb hunger and prevents overeating at the next meal. It also stabilizes blood sugar, which can improve focus and mood throughout the day. When your snack offers a balanced dose of protein, carbohydrates, and healthy fats, you create a nourishing mini meal that supports fitness goals and sustained vitality.
Choosing the Perfect Ingredients for a Nutritious Mug Cake
Selecting the right ingredients is key to making a flavorful mug cake that’s both wholesome and indulgent. Opt for high-quality protein powders like whey, pea, or collagen to seamlessly blend nutrition with flavor. Using almond flour or oats rather of plain flour enhances fiber content and adds a delightful texture. Natural sweeteners such as honey or maple syrup keep it wholesome,while a pinch of baking powder ensures fluffiness. don’t forget to add a splash of milk or dairy-free alternatives for moisture and tenderness.
Prep and Cook Time
- Planning: 5 minutes
- Cooking: 90 seconds
- Total Time: 6 minutes
yield
serves 1 (single-serving mug cake)
Difficulty Level
Easy
Ingredients
- 4 tbsp almond flour, finely ground
- 1 scoop vanilla protein powder (about 30g)
- 1 tbsp cocoa powder (optional, for a chocolate twist)
- 1/4 tsp baking powder, to help it rise
- 1 large egg
- 3 tbsp milk (dairy or plant-based)
- 1 tbsp honey or maple syrup
- 1/2 tsp vanilla extract
- Pinch of salt, to enhance flavor
Step by Step Guide to Mixing Your Protein-Packed Mug Cake
- Combine dry ingredients: In a microwave-safe mug, whisk together almond flour, protein powder, cocoa powder, baking powder, and salt until evenly blended.
- Add wet ingredients: Crack in the egg, then pour the milk, honey, and vanilla extract over the dry mix.
- Mix thoroughly: Stir vigorously with a fork or small whisk until the batter is smooth and slightly thick, making sure ther are no dry pockets.
- Microwave: Cook in the microwave on high for 90 seconds. Watch closely after 60 seconds to prevent overcooking; the cake shoudl spring back lightly when poked.
- Cool briefly: Let your mug cake rest for 1-2 minutes to set and cool down slightly before digging in.
Tips for Customizing Flavors and Boosting Nutritional Value
Feel free to tailor this protein-packed mug cake to your craving or dietary needs. Swap vanilla protein powder for chocolate or berry flavors for a unique taste adventure. For extra antioxidants, toss in a handful of fresh blueberries or sliced strawberries before cooking. Boost healthy fats by stirring in a teaspoon of almond butter or chia seeds.To keep it vegan, replace the egg with a flaxseed egg (1 tbsp ground flax + 3 tbsp water) and choose plant-based protein powders.
Remember, texture varies depending on your protein powder brand – if the batter feels too dry, add an extra tablespoon of milk. If it’s too wet, sprinkle in a bit more almond flour. Experimenting is part of the fun!
Chef’s Notes
- Microwave power varies: Adjust cooking time slightly if your mug cake is undercooked or overbaked.
- Make ahead: batter can be prepped in advance and kept refrigerated for up to 24 hours.
- Flavor boosters: Add a pinch of cinnamon or espresso powder for subtle complexity.
- Texture tip: For a moister cake, add 1 tbsp Greek yogurt or applesauce to the batter.
Serving Suggestions
Serve warm straight from the mug or gently loosen edges with a butter knife and invert onto a plate for a rustic presentation. Top with fresh berries, a drizzle of nut butter, or a dollop of whipped cream for an indulgent finish. Sprinkle chopped nuts or cacao nibs on top for satisfying crunch and extra protein. Pair with a cup of green tea or your favorite post-workout smoothie to complete your energizing snack break.

| nutrient | Per Serving |
|---|---|
| Calories | 320 kcal |
| Protein | 28 g |
| Carbohydrates | 14 g |
| Fat | 15 g |
For more nutritious snack ideas like this, check out our Healthy High-Protein Snacks Collection. To understand further why protein is essential, visit Healthline’s guide on protein benefits.
Q&A
Q&A: Power Up Your Snack – Easy Protein-Packed Mug Cake Recipe
Q1: What makes this mug cake recipe “protein-packed”?
A1: Unlike customary mug cakes loaded with sugar and empty carbs, this recipe incorporates high-quality protein sources like protein powder and Greek yogurt. these ingredients boost your muscle recovery and keep you fuller longer-perfect for a quick, energized snack.Q2: How quick and easy is this mug cake to prepare?
A2: Incredibly quick! This recipe takes just about 5 minutes from start to finish. Simply mix your ingredients in a mug,microwave for around 90 seconds,and voilà-a warm,fluffy protein mug cake is ready to power you through the day.
Q3: Can I customize this mug cake to suit my dietary needs?
A3: Absolutely! The base recipe is versatile. Swap dairy-based protein powder for plant-based options,use choice flours like almond or oat flour instead of all-purpose,or add your favorite mix-ins like nuts,berries,or dark chocolate chips to keep it exciting and aligned with your diet.
Q4: Is this recipe suitable for meal replacement or just a snack?
A4: While it’s primarily designed as a protein-packed snack to bridge the gap between meals or post-workout treats, its high protein and balanced carbs can satisfy hunger effectively.For a full meal replacement, consider pairing it with a piece of fruit or a small salad for added vitamins and fiber.
Q5: What are some tips for getting the perfect texture in my protein mug cake?
A5: Avoid overcooking! Microwaves vary, so check your mug cake at 60 seconds and continue in 15-second bursts if needed. Also,using the right ratio of wet and dry ingredients-like Greek yogurt for moisture and protein powder for density-helps maintain that tender,cake-like texture without dryness.
Q6: How does this snack help with fitness goals?
A6: Protein is essential for muscle repair and growth, while balanced carbs give you energy without crashes. This mug cake delivers both, making it an ideal snack before or after workouts to fuel performance and accelerate recovery, all while satisfying sweet cravings guilt-free.
Q7: Can kids or picky eaters enjoy this protein mug cake?
A7: Definately! The mug cake is customizable and mild in flavor, so you can adjust sweetness and mix-ins to suit young taste buds. It’s a sneaky way to pack in nutrients while delighting children with a tasty, quick treat.
Ready to power up your snack time? Grab a mug and your favorite protein powder-the easiest,most tasty snack upgrade is just minutes away!
Key Takeaways
Whether you’re powering through a busy afternoon or need a quick post-workout boost,this protein-packed mug cake proves that delicious and nutritious can coexist in just minutes. No more sacrificing flavor for fuel-just simple ingredients, speedy prep, and a fluffy, satisfying snack ready whenever you are. So next time hunger strikes, grab your mug and whip up this effortless treat to fuel your day the tasty way!
Shrimp stir fry unlocks vibrant flavors and stunning textures that make any meal exceptional. Choosing the freshest shrimp and crispest veggies is essential to bringing this dish to life in a way that delights your palate and elevates your dining experience.
Prep and Cook Time
- Preparation: 15 minutes
- Cooking: 10 minutes
- Total Time: 25 minutes
Yield
Serves 4 hungry food lovers
Difficulty Level
Easy – perfect for weeknight meals or casual entertaining
Ingredients
- 1 lb fresh shrimp, peeled and deveined
- 1 red bell pepper, thinly sliced
- 1 cup snap peas, trimmed
- 1 medium carrot, julienned
- 1 small zucchini, sliced into half-moons
- 3 cloves garlic, finely minced
- 1 tbsp fresh ginger, grated
- 2 tbsp vegetable oil or peanut oil
- 2 green onions, sliced diagonally
- 1/4 cup low-sodium soy sauce
- 2 tbsp oyster sauce
- 1 tbsp rice vinegar
- 1 tbsp honey or maple syrup
- 1 tsp toasted sesame oil
- 1/2 tsp red pepper flakes (optional, for a gentle kick)
- 1 tsp cornstarch mixed with 2 tbsp cold water (slurry)
Instructions
- Selecting and prepping shrimp: Rinse the shrimp under cold water and pat dry with paper towels to ensure a perfect sear. Fresh shrimp should smell clean,not fishy,with firm,translucent flesh.
- Prepare vegetables: Choose vibrant, firm veggies without soft spots or discoloration. Crisp snap peas and bright bell peppers add crunch and color, enhancing both texture and presentation.
- Mix the stir fry sauce: In a small bowl,whisk together the soy sauce,oyster sauce,rice vinegar,honey,sesame oil,and red pepper flakes until combined.
- Heat the wok or skillet: Warm the oil over medium-high heat until shimmering but not smoking. Add the garlic and ginger-stir quickly to release their aroma, about 30 seconds.
- Cook the shrimp: Add shrimp in a single layer. Sauté until opaque and pink, about 2 minutes per side. Remove shrimp and set aside to avoid overcooking.
- Stir fry vegetables: Toss in carrots first, cooking for 2 minutes, then add bell peppers, snap peas, and zucchini. Stir continuously to maintain crispness, about 3-4 minutes total.
- Reintroduce shrimp: Return shrimp to the wok and pour in the sauce mixture. Stir to coat everything evenly.
- Thicken the sauce: Add cornstarch slurry to the wok. Stir and cook for another minute, until sauce thickens to a silky glaze that clings beautifully to the ingredients.
- Finish with green onions: Remove from heat, sprinkle sliced green onions over the top for freshness and visual appeal.
Tips for Success
- Substitutions: Swap shrimp for chicken or tofu for a vegetarian-friendly option without losing richness.
- Balance textures: Avoid overcrowding the pan; cook in batches if needed to keep veggies crisp and shrimp tender.
- Make-ahead sauce: Prepare the stir fry sauce in advance and store in the fridge for up to 3 days to speed up cooking.
- Enhance flavor: Toast sesame seeds lightly and sprinkle before serving for a nutty crunch.
- Troubleshooting: If the sauce is too thin, cook a little longer; if too thick, stir in a splash of water or broth.
Serving Suggestions
Serve your shrimp and veggie stir fry over fluffy jasmine rice or delicate rice noodles to soak up every bit of the luscious sauce. Garnish with fresh cilantro leaves, extra green onions, and a wedge of lime to add bright, zesty contrast.For added crunch, sprinkle crushed peanuts or cashews on top.

| Nutrient | Per Serving |
|---|---|
| Calories | 280 |
| Protein | 28g |
| Carbohydrates | 15g |
| Fat | 8g |
For more inspiration on creative seafood recipes, check out our Healthy Seafood Dinners collection. Learn about shrimp sustainability and health benefits on the Seafood Nutrition Partnership.
Q&A
Q&A: Savor the Flavor – Easy Shrimp and Veggie Stir Fry Recipe
Q1: What makes this shrimp and veggie stir fry recipe stand out?
A1: This stir fry strikes the perfect balance between simplicity and bold flavor.It combines succulent shrimp with crisp, colorful vegetables, all tossed in a savory sauce that’s both bright and comforting. Plus, it’s ready in under 30 minutes-ideal for busy weeknights without sacrificing taste.
Q2: Which vegetables work best for this stir fry?
A2: The beauty of this recipe is it’s versatility. Classic choices include bell peppers, snap peas, broccoli florets, and carrots for a medley of textures and colors. Feel free to get creative with zucchini, mushrooms, or baby corn to match your pantry or season.
Q3: Can I substitute the shrimp with other proteins?
A3: Absolutely! While shrimp cooks quickly and offers a light seafood flavor, chicken breast, tofu, or even thinly sliced beef can make excellent alternatives.Just adjust the cooking time accordingly to ensure your protein is perfectly cooked.
Q4: what’s the secret to a perfectly cooked stir fry?
A4: High heat and quick cooking are basic. Preheat your pan or wok until it’s smoking hot before adding ingredients. This ensures your veggies stay crisp and vibrant while the shrimp gets a gorgeous sear-no steaming allowed!
Q5: How can I make the stir fry sauce extra flavorful?
A5: Layer your flavors with a mix of soy sauce, garlic, ginger, and a touch of honey or brown sugar for sweetness. A splash of rice vinegar or lime juice adds brightness, and a sprinkle of chili flakes will bring the heat if you’re feeling adventurous.
Q6: Is this recipe healthy?
A6: Yes! This dish is packed with lean protein and nutrient-rich vegetables. Stir frying preserves the veggies’ vitamins and minerals, and using minimal oil keeps it light. It’s a delicious, balanced meal that fuels your body and satisfies your taste buds.
Q7: Any tips for serving this shrimp and veggie stir fry?
A7: Serve it over steamed jasmine rice or fluffy quinoa to soak up the sauce. Garnish with chopped scallions, toasted sesame seeds, or fresh cilantro for an extra burst of flavor and visual appeal. Leftovers reheat well, making it a perfect make-ahead meal too!
To Conclude
As the final sizzle settles and the vibrant colors of your shrimp and veggie stir fry come to life on the plate, you’ve not only crafted a meal but a celebration of fresh, simple ingredients dancing in harmony. This easy recipe invites you to savor each bite – a perfect balance of tender shrimp, crisp veggies, and savory sauce, all ready in a flash.Whether you’re a kitchen novice or a seasoned home cook, this dish is a flavorful reminder that healthy, delicious meals don’t have to be elaborate.So next time hunger calls, dive into this stir fry and turn everyday dining into a colorful, satisfying experience that nourishes both body and soul.
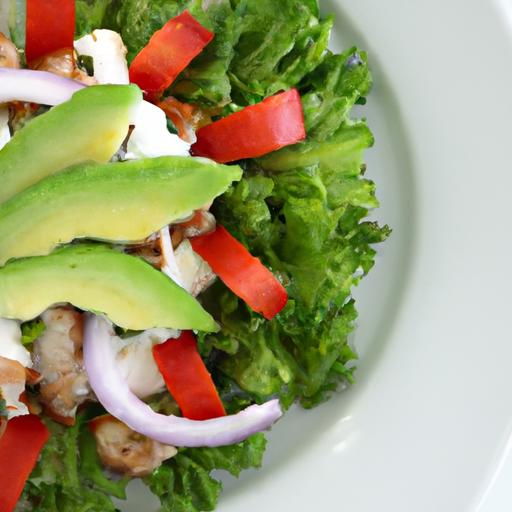
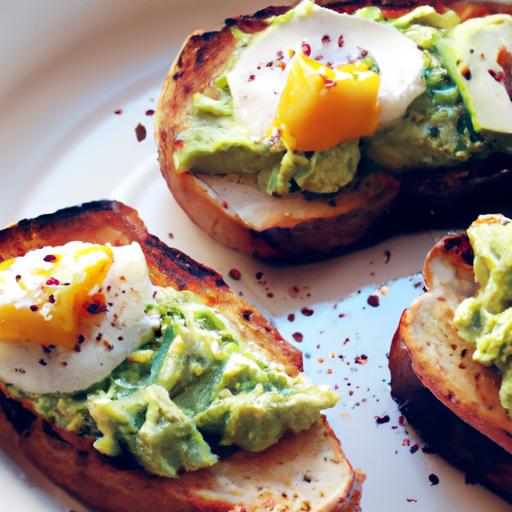
Egg-loaded avocado toasts: easy recipes to elevate breakfast bring a magical harmony of creamy avocado and protein-rich eggs that can transform a simple morning meal into a sumptuous, nourishing experience. This dish, rooted in California’s healthy food culture yet embraced worldwide, is as versatile as it is flavorful. Whether you’re craving a silky scrambled egg or a delicately poached one, pairing it with the perfect avocado base and thoughtful toppings makes all the difference.Let’s dive into how you can master this iconic breakfast, step by step.
Prep and Cook Time
- Preparation: 10 minutes
- Cooking: 10 minutes
- Total Time: 20 minutes
Yield
Serves 2 hearty portions
Difficulty Level
Easy to Medium (Suitable for beginner cooks wanting to impress)
Ingredients
- 2 ripe avocados, peeled and pitted
- 4 large eggs (choose organic or free-range for best flavor)
- 4 slices of artisan bread (sourdough or multigrain recommended)
- 1 tablespoon fresh lemon juice
- Salt and freshly ground black pepper, to taste
- 1 tablespoon olive oil (for toasting bread or cooking eggs)
- Pinch of smoked paprika or chili flakes (optional)
- Fresh herbs like cilantro, chives, or parsley for garnish
- Optional toppings: cherry tomatoes, feta cheese, microgreens, toasted seeds, or crispy bacon bits
Instructions
- prepare the avocado base: In a medium bowl, mash the peeled avocados with lemon juice, salt, and pepper until creamy but still slightly chunky. This preserves texture and flavor balance.
- Toast the artisan bread: Lightly brush the bread slices with olive oil. toast them until golden brown and crisp around the edges, about 3-4 minutes per side using a skillet or toaster oven.This crunch creates a perfect contrast to the creamy avocado.
- Cook the eggs your favourite way:
- To poach eggs: Bring a pot of water to a gentle simmer and add a splash of vinegar. Crack each egg into a small bowl, then gently slide into the water. Cook for 3-4 minutes for runny yolks. Remove with a slotted spoon and drain thoroughly.
- To scramble eggs: Whisk eggs with a pinch of salt. Melt butter or heat olive oil in a non-stick pan over medium-low heat. Pour eggs in and stir gently with a spatula until soft curds form, about 4-5 minutes. Remove while still slightly undercooked.
- Assemble the toast: Spread a generous layer of avocado mash on each toasted bread slice. Top each with your cooked eggs, carefully layering them to showcase thier texture-poached with glossy yolks or fluffy scrambled eggs.
- Add flavor boosters and toppings: Sprinkle smoked paprika or chili flakes for subtle heat. Garnish with fresh herbs, crumbled feta, or a scattering of cherry tomato halves. Add crunchy seeds or crispy bacon bits for textural contrast.
- Serve instantly: For the best experience, eat while the toast is still crisp and the eggs warm.
Tips for Success
- Choosing your avocado: Look for avocados that are slightly soft but not mushy. The perfect avocado mash has a balance of creaminess and bite.
- Egg cooking tips: To master poached eggs, use fresh eggs and keep water at a gentle simmer (not boiling) to avoid swirling or breaking the whites.
- Make it ahead: Prep avocado mash and toast the bread in advance,then cook eggs fresh to keep the toast crisp and vibrant.
- Vegan variation: Substitute eggs with tofu scramble and use nutritional yeast for a cheesy undertone.
- Experiment with flavors: Try topping with za’atar spice blend, sliced radishes, or a drizzle of chili-infused honey for a gourmet twist.
Serving Suggestions
present your egg-loaded avocado toasts on a rustic wooden board or a bright ceramic plate to contrast their luscious green and golden hues. Pair with freshly brewed coffee or a refreshing citrus juice. Garnish with edible flowers or microgreens for a café-worthy finish. This dish shines as a nourishing breakfast, an elegant brunch centerpiece, or a vibrant light lunch.

| Nutrient | Per Serving |
|---|---|
| Calories | 350 kcal |
| Protein | 14 g |
| Carbohydrates | 28 g |
| Fat | 20 g |
For more creative avocado recipes, check out our Healthy Avocado Breakfast Ideas. To deepen your knowledge on the health benefits of avocado, visit Healthline’s comprehensive guide.
Q&A
Q&A: Egg-Loaded Avocado toasts – Easy Recipes to Elevate Breakfast
Q1: What makes egg-loaded avocado toast such a popular breakfast choice?
A1: Its the perfect harmony of creamy avocado, rich protein-packed eggs, and crunchy toast-all combining to fuel your morning with flavor and nutrients. The dish is quick to prepare, visually appealing, and endlessly customizable, making it a breakfast superstar for health-conscious foodies and busy folks alike.
Q2: Which type of eggs work best for avocado toast?
A2: It depends on your mood and texture preference! Poached eggs offer a luscious, runny yolk that acts like a velvety sauce. Fried eggs bring a golden crispness to the edges, while scrambled eggs create a fluffy, comforting layer. Even soft-boiled or boiled eggs can add a delightful bite. The beauty lies in experimenting and finding your favorite combo.
Q3: How can I make my avocado toast extra creamy and flavorful?
A3: Start with ripe avocados-soft to the touch but not mushy.Mash them with a squeeze of fresh lemon or lime juice to brighten the taste and prevent browning. Add a pinch of sea salt, a dash of cracked black pepper, and maybe a sprinkle of red pepper flakes or smoked paprika to awaken your taste buds.
Q4: Are there any creative toppings to elevate egg-loaded avocado toasts?
A4: Absolutely! think beyond the basics: crumbled feta or goat cheese for tanginess, cherry tomato halves for juicy bursts, crisp bacon or smoked salmon for savory depth, or fresh herbs like cilantro, chives, or basil for aromatic freshness. Drizzle a touch of chili oil or balsamic glaze to add layered complexity.
Q5: What’s the best bread choice for egg-loaded avocado toast?
A5: Artisan breads like sourdough, whole grain, or rye work wonders because of their sturdy texture and rich flavor. A slightly toasted slice holds up well under creamy avocado and runny egg without turning soggy. For gluten-free eaters, seeded gluten-free bread or crisp crackers can be fantastic alternatives.
Q6: How can I make this dish more nutritious without sacrificing taste?
A6: Add nutrient-dense extras like a handful of baby spinach or arugula, sprinkle chia seeds or hemp hearts for omega-3s, or add sliced avocado’s cousin-cucumber or radish-for crunch and hydration. Incorporating microgreens or a side of fresh fruit amps up vitamins while keeping breakfast fresh and vibrant.
Q7: Can egg-loaded avocado toast fit into a busy morning routine?
A7: Definitely! With simple prep hacks-like toasting bread while you mash avocado and poach eggs-it can come together in under 10 minutes. You can also prepare ingredients the night before, such as boiled eggs or pre-mashed avocado (stored with a squeeze of lemon to keep it fresh), so your busy mornings start with minimal fuss and maximum flavor.
Q8: Is this breakfast suitable for meal prepping or brunch gatherings?
A8: While avocado toast is best enjoyed fresh to preserve the avocado’s color and texture, you can meal prep components like roasted tomatoes, cooked bacon, or hard-boiled eggs to assemble quickly. For brunch, setting up a DIY avocado toast bar with various toppings and egg styles invites guests to customize their own delicious creations-a fun and interactive start to the day.
Whether you crave the classic simplicity or adventurous twists, egg-loaded avocado toasts bring creativity, nutrition, and effortless delight to breakfast tables worldwide. Give these recipes a whirl and watch your mornings transform into a delicious celebration!
In Conclusion
As the sun rises and morning routines unfold, elevating your breakfast with egg-loaded avocado toasts can transform the start of your day into a deliciously satisfying ritual. Whether you prefer the classic sunny-side-up, a silky poached egg, or a fluffy scrambled topping, these easy recipes offer a perfect harmony of flavors and nutrients. So next time you reach for your avocado, remember that with just a few simple steps, you can create a breakfast that’s not only nourishing but also bursting with creativity. Embrace the art of avocado toast-where every bite is a celebration of morning goodness.
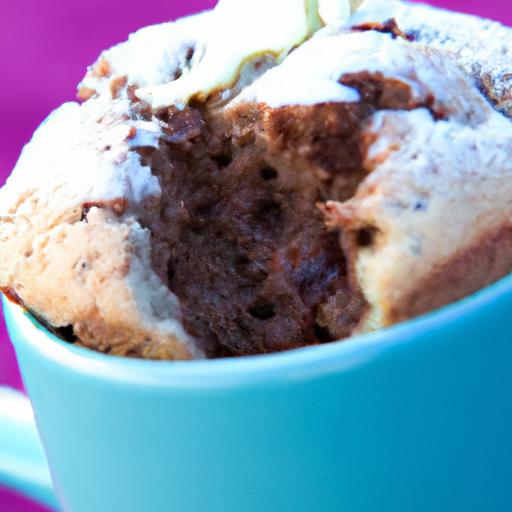
Microwave magic infuses delight and convenience into every bite of this easy chocolate chip mug cake. Imagine a warm, fluffy cake rising within seconds, studded with melt-in-your-mouth chocolate chips – a perfect treat born from the desire for instant comfort food without the fuss. this recipe transforms simple pantry staples into a personal indulgence, delivering softness, rich flavor, and a touch of nostalgia, all crafted in a mug!
Prep and Cook Time
Prep Time: 5 minutes
Cook Time: 1 minute 30 seconds
Yield
1 single-serving mug cake (perfect for one hungry soul or a quick dessert fix)
Difficulty Level
Easy – no baking expertise required, just whisk, microwave, and enjoy!
Ingredients
- 4 tbsp all-purpose flour, sifted
- 2 tbsp granulated sugar
- 1/8 tsp baking powder
- A pinch of salt
- 3 tbsp milk (whole or your choice of plant-based)
- 1 tbsp vegetable oil or melted butter
- 1/4 tsp vanilla extract
- 2 tbsp mini chocolate chips, plus extra for topping
Instructions
- Combine dry ingredients: In a microwave-safe mug, whisk together the flour, sugar, baking powder, and salt to ensure even rising.
- add wet ingredients: Pour in the milk, vegetable oil, and vanilla extract. Mix thoroughly until a smooth batter forms without lumps.
- Fold in chocolate chips: Gently stir in 2 tablespoons of the mini chocolate chips, reserving a few for the topping to encourage melting on the surface.
- Prepare for cooking: Sprinkle the reserved chips atop the batter for that enticing melty finish.
- Microwave: Cook on high power for 1 minute 30 seconds to 2 minutes. The exact time varies by microwave wattage; the cake should spring back lightly when touched.
- Rest briefly: Let the mug cake rest for 1 minute post-cooking as residual heat completes the cooking,ensuring a tender crumb.
- Enjoy instantly: Dig in warm for gooey chocolate pockets and pillowy softness.
Tips and Tricks to Customize Your Mug Cake for Maximum Flavor
- Boost richness: Swap vegetable oil with melted butter or coconut oil for deeper flavor.
- Healthier option: Substitute half the flour with whole wheat pastry flour or oat flour.
- Flavor variations: Add a pinch of cinnamon, espresso powder, or orange zest for a gourmet twist.
- Nutty crunch: Toss in chopped walnuts or pecans paired with the chocolate chips.
- Dairy-free: Use almond or oat milk and coconut oil to keep the mug cake vegan-amiable.
- Sweetness control: Adjust the sugar amount based on your preference for a more subtle or sweeter treat.
troubleshooting Common Mug Cake Mistakes for Perfect Results Every Time
- Dry or crumbly texture? Likely overcooked. Reduce microwave time by 10-second increments next round, as microwaves vary.
- Dense or heavy cake? Be sure to measure flour correctly and sift it to avoid compact batter.
- Undercooked or soggy center? Stir batter thoroughly and ensure the baking powder is fresh for proper rise.
- Overflowing mug? Use a larger mug-the batter nearly doubles in volume while cooking.
Serving Suggestions
Serve your freshly made chocolate chip mug cake right in the mug for that charming homemade feel. Elevate presentation by adding a scoop of vanilla ice cream or a dollop of whipped cream on top. A drizzle of warm caramel or chocolate sauce intensifies the indulgence. sprinkle with powdered sugar or crushed nuts for a subtle crunch and eye-catching contrast. Pair with a steaming cup of coffee or chai tea to turn this quick treat into an elevated dessert experience.

Nutritional Facts
| Nutrient | Per Serving |
|---|---|
| Calories | 320 kcal |
| Protein | 5 g |
| Carbohydrates | 42 g |
| Fat | 14 g |
For those interested in exploring more quick microwave treats,check out our Microwave Dessert Recipes. To deepen your understanding of baking powder’s role in leavening, visit this complete science guide by King Arthur Baking.
Q&A
Q&A: Microwave Magic – Your Guide to an Easy Chocolate Chip Mug Cake
Q1: What is a chocolate chip mug cake, and why is it so popular?
A1: A chocolate chip mug cake is a single-serving cake that you mix and cook right in a mug using a microwave. Its popularity comes from its sheer convenience-it’s quick, requires minimal ingredients, and delivers that warm, gooey chocolate chip goodness in under five minutes. Perfect for a sudden sweet craving without the mess of baking a full cake!
Q2: What ingredients do I need to make this mug cake?
A2: You’ll need a few pantry staples: all-purpose flour, sugar, baking powder, a pinch of salt, milk, vegetable oil (or melted butter), vanilla extract, and of course, chocolate chips. Simple, everyday ingredients combine to create a decadent treat in minutes.
Q3: How do you achieve the perfect texture for a microwave mug cake?
A3: The key is balance-enough moisture from the milk and oil to keep it tender, but not so much that it turns soggy. Mixing just until combined avoids a tough bite. Also, microwaving at high power for around 60 to 90 seconds ensures the cake cooks through yet stays soft. Remember, microwaves vary, so adjust time slightly if needed!
Q4: Can I customize the recipe?
A4: Absolutely! Swap chocolate chips for nuts, berries, or even peanut butter swirls. Add a dash of cinnamon or espresso powder for an extra flavor punch. For a dairy-free twist, try almond or oat milk and coconut oil instead.The mug cake is your canvas-craft your own microwave masterpiece.
Q5: Is this recipe healthy?
A5: While it’s a small portion, this mug cake is still a dessert with sugar and oil, so it’s best enjoyed in moderation. Though, as it’s made for one, it helps with portion control and avoids overindulgence compared to bigger cakes. You can experiment with whole wheat flour or sugar substitutes if you want a slightly healthier version.
Q6: What if my mug cake turns out dry or rubbery?
A6: That’s usually a sign of overcooking or too much flour. Try reducing the cooking time by 10-15 seconds next time, and double-check your measurements. Using a larger mug can also help the cake cook evenly without drying out. Remember, microwave wattage varies-some trial and error is normal!
Q7: Can I prepare the batter in advance?
A7: It’s best to prepare and cook the batter fresh for optimal texture and rise. If needed, you can mix the dry ingredients ahead of time and add wet ingredients just before microwaving. The magic of this recipe lies in its immediacy-freshly made mug cake tastes best!
Q8: Any tips for serving?
A8: Serve it straight from the mug while warm for a cozy treat. Top with a scoop of vanilla ice cream, a drizzle of caramel sauce, or a dusting of powdered sugar to elevate the experience. A sprinkle of flaky sea salt over the chocolate chips can also create a delightful sweet-salty contrast.
Microwave magic is all about convenience and delight. With this easy chocolate chip mug cake recipe, satisfy your sweet tooth in a flash-no oven, no fuss, just pure chocolatey comfort at your fingertips!
To Wrap it Up
With just a few simple ingredients and a microwave, you’ve unlocked the secret to instant chocolate chip bliss-no oven, no fuss, just pure, gooey magic in a mug. Weather you’re craving a quick dessert fix or a cozy treat to brighten your day, this easy mug cake recipe proves that sometimes the best indulgences come in the smallest packages. So the next time your sweet tooth calls, remember: a warm, chocolate-studded delight is just minutes away, ready to turn an ordinary moment into something deliciously extraordinary. Happy microwaving!

Quick Prep Tips for perfectly Juicy Shrimp Every time
the secret to succulent shrimp starts before they even hit the pan. When making 15-Minute Creamy Garlic Shrimp, selecting fresh or properly thawed shrimp and drying them thoroughly will ensure they sear to perfection without steaming. Opt for medium to large shrimp, peeled and deveined, leaving the tails on for extra flavor and an elegant presentation. Pat each shrimp dry with paper towels to remove excess moisture, which is key for achieving that irresistible golden crust.
For an added layer of flavor, consider a quick marinade of lemon juice, garlic, and a pinch of smoked paprika for just 10 minutes-never longer, or the acid will start to “cook” the shrimp. When cooking, use a hot skillet with a splash of olive oil or clarified butter, ensuring each shrimp gets a quick, even sear that locks in all those natural juices.
Crafting the Creamy Garlic Sauce That Steals the Show
The hallmark of this quick shrimp dish is the luscious,silky cream garlic sauce that envelops each bite. Start by gently sautéing fresh minced garlic in a combination of butter and olive oil until fragrant and just turning golden-about 30 seconds to a minute. Avoid browning the garlic too much to keep the sauce smooth and mellow. Deglaze the pan with a splash of dry white wine or chicken broth to lift the caramelized bits, adding depth.
Slowly whisk in heavy cream, stirring constantly to create a dreamy base. A hint of freshly grated Parmesan and a squeeze of fresh lemon juice brighten the sauce and perfectly balance the richness, making every forkful memorable. For texture and a slight tang, stir in a teaspoon of Dijon mustard-an elegant but fuss-free touch that elevates the entire dish.
Pairing Your dish with the Ideal Sides and Wines
The luminous, creamy notes of the 15-Minute Creamy Garlic Shrimp invite versatile pairing options that enhance your meal effortlessly. Serve over al dente pasta such as linguine or angel hair to soak up the flavorful sauce, or rest the shrimp atop a bed of fluffy cauliflower rice for a low-carb choice.
For veggies, sautéed asparagus or garlicky spinach offer a fresh, vibrant contrast. Crispy garlic bread or warm focaccia rounds out the plate beautifully. When it comes to wine, opt for a crisp, aromatic white like Sauvignon Blanc or a lightly oaked chardonnay. These choices emphasize the dish’s garlicky creaminess and complement the shrimp’s delicate sweetness without overpowering it.
Expert Tricks to Elevate Flavor Without Adding Fuss
To maximize flavor while keeping prep quick, use pantry staples smartly. A pinch of smoked paprika or crushed red pepper flakes in the shrimp seasoning brings subtle warmth and complexity. Fresh herbs like parsley or chives brighten the final dish-toss them in last minute for a pop of color and freshness.
Don’t overlook the power of finishing touches: a zest of lemon or a sprinkle of flaky sea salt right before serving amplifies layers of flavor. If you want to add texture, lightly toast pine nuts or finely chopped toasted almonds on top-they add unexpected crunch without any extra cooking time.
For an even creamier sauce, swirl in a small pat of cold butter off the heat at the end-this glossy finish will take your 15-Minute Creamy Garlic Shrimp from simple to sublime in a heartbeat.

Q&A
Q&A: 15-Minute Creamy Garlic Shrimp – Easy & Delicious Recipe
Q1: What makes this creamy Garlic shrimp recipe so special?
A1: It’s the perfect blend of fast and flavorful! In just 15 minutes, you get tender shrimp swimming in a luscious, garlicky cream sauce. It’s a little indulgence with minimal effort-perfect for busy weeknights or last-minute guests.
Q2: Can I use frozen shrimp for this recipe?
A2: Absolutely! Just make sure to thaw and pat the shrimp dry before cooking to avoid excess moisture. Using frozen shrimp keeps the recipe budget-friendly without sacrificing taste or texture.
Q3: What kind of garlic works best for this dish?
A3: Fresh garlic is your best friend here. Its pungent aroma and vibrant flavor really elevate the creamy sauce. Mince it finely to release maximum flavor quickly during sautéing.
Q4: Is the sauce heavy or overly rich?
A4: Not at all! The cream sauce strikes a delightful balance-rich enough to coat the shrimp beautifully but light enough to keep it elegant and easy on the palate. Plus, garlic and a splash of lemon juice brighten the whole dish.
Q5: Can I customize the recipe for dietary preferences?
A5: Definitely. For a dairy-free twist, substitute heavy cream with coconut milk or cashew cream.If you want it spicier, add a pinch of red pepper flakes. Fresh herbs like parsley or basil can also add a vibrant punch.
Q6: What’s the best way to serve this creamy garlic shrimp?
A6: It pairs perfectly with fluffy rice, buttery pasta, or even crusty bread to soak up the sauce. For a lighter option, try it over steamed veggies or zucchini noodles.
Q7: How do I avoid overcooking the shrimp?
A7: Shrimp cook fast-typically 2-3 minutes per side until they turn pink and opaque. Keep a close eye and stop cooking as soon as they curl and firm up to maintain that tender, juicy texture.
Q8: Can I prepare parts of the dish in advance?
A8: Yes! You can mince garlic ahead or even pre-cook the shrimp lightly. Just toss everything together and finish with the sauce when you’re ready to eat-it’ll speed things up even more.
Q9: Is this recipe kid-friendly?
A9: Absolutely. The creamy, mild garlic flavor is generally a crowd-pleaser for all ages. You can skip the spiciness or herbs if your little ones prefer simpler tastes.
Q10: What’s the best kitchen tool to make this recipe?
A10: A large skillet or sauté pan is ideal. It gives you enough room to sear the shrimp evenly and create that silky garlic cream sauce without fuss.
Ready to whip up a quick restaurant-worthy meal? This 15-Minute Creamy Garlic Shrimp recipe is your ticket to a delicious dinner that feels fancy but cooks up in a flash!
Wrapping Up
Ther you have it-a quick, creamy garlic shrimp recipe that proves you don’t need hours in the kitchen to create a dish bursting with flavor.In just 15 minutes, you can transform simple ingredients into a luscious, satisfying meal that’s perfect for busy weeknights or impressing last-minute guests. Whether served over pasta, rice, or a bed of fresh greens, this easy recipe invites you to savor the magic of garlic, cream, and succulent shrimp in every bite. So next time hunger strikes, remember: delicious doesn’t have to be complicated. Happy cooking!

Why No-Bake Oatmeal Cookies Are Perfect for Busy Schedules
Quick & Easy No-Bake Oatmeal Cookies have become a beloved staple for anyone juggling hectic days but craving something homemade, wholesome, and delicious. These cookies hail from a tradition rooted in simplicity-no oven required and minimal fuss. Whether you’re a busy parent, a student, or just someone who values convenience, these cookies offer an instant satisfaction with their chewy texture and comforting flavors. Their rapid preparation means you can whip up a batch in under 15 minutes, no matter how tight your schedule is.
What makes these treats especially magical is how they transform basic pantry staples-like rolled oats and cocoa powder-into a rich, gooey indulgence. They’re perfect for meal prepping, after-school snacks, or a quick energy boost without the wait.
Prep and Cook Time
- Preparation: 5 minutes
- Cooking: 7 minutes
- Total Time: 12 minutes
Yield
Approximately 24 medium-sized cookies
Difficulty Level
Easy – No baking skills required, perfect for beginners and busy cooks alike.
Essential Ingredients for Deliciously chewy no-Bake Oatmeal Cookies
- 2 cups old-fashioned rolled oats
- 1/2 cup unsweetened cocoa powder
- 1 cup granulated sugar
- 1/2 cup unsalted butter
- 1/2 cup whole milk
- 1 teaspoon vanilla extract
- 1/4 teaspoon salt
- Optional: 1/2 cup chopped nuts or shredded coconut for texture variations
Step-by-Step Guide to Crafting Quick No-Bake Oatmeal Cookies
- Prepare your workspace: Line a baking sheet with parchment paper or a silicone mat to ensure easy cookie removal.
- Combine the base ingredients: In a medium saucepan over medium heat,melt butter with sugar and milk. Stir constantly until the mixture comes to a rolling boil, about 1-2 minutes.
- Add cocoa and vanilla: Quickly stir in the unsweetened cocoa powder and vanilla extract until fully incorporated and smooth.
- Remove from heat and fold in oats: Instantly add the rolled oats and salt, mixing thoroughly to coat every flake with the chocolatey mixture. If using, fold in your choice of nuts or coconut hear for extra crunch.
- Scoop and shape: Using a tablespoon or cookie scoop, drop spoonfuls onto the prepared baking sheet. Flatten slightly with the back of the spoon for classic cookie shape.
- Chill and set: Allow cookies to cool at room temperature for 30 minutes or speed up the process by refrigerating for 15 minutes until firm to the touch.
- Enjoy: Serve immediately or store in an airtight container for up to one week.
Expert Tips for Customizing Your No-Bake Oatmeal Cookie Creations
1. Sweetness level: Adjust sugar to taste or substitute with natural sweeteners like honey or maple syrup for a different flavor profile.
2. Texture twists: Swap rolled oats for quick oats if you want a softer bite, or add chopped dried fruit, such as raisins or cranberries, to introduce subtle tartness.
3. Nut-free option: Leave out nuts and increase shredded coconut or mini chocolate chips for kid-friendly variations.
4.Make-ahead magic: Cookies store beautifully in the fridge or freeze well for up to a month-perfect for prepping snacks ahead of time.
5. Troubleshooting: If your cookie mixture is too dry, add a splash more milk before shaping. for overly sticky batter,place it in the fridge for a few minutes to firm up before scooping.
Serving Suggestions
These cookies shine when served alongside a glass of cold milk, a steaming cup of coffee, or even a dollop of whipped cream. For an elegant touch, sprinkle with a light dusting of powdered sugar or a drizzle of melted peanut butter. They also make a superb addition to an afternoon snack platter paired with fresh fruit and nuts for contrast.
Perfect for gifting, place a few no-bake treats in a pretty cellophane bag tied with a ribbon for an easy, homemade present.

| Nutrient | Per Serving (1 Cookie) |
|---|---|
| Calories | 120 |
| Protein | 2g |
| carbohydrates | 18g |
| Fat | 5g |
For more quick and effortless recipes,explore our No-Bake Desserts Collection. To deepen your understanding of the nutritional benefits of oats, visit the Healthline Oats Benefits Guide.
Q&A
Q&A: Quick & Easy No-Bake Oatmeal Cookies – A Tasty Treat Recipe
Q1: What makes no-bake oatmeal cookies a grate treat?
A1: No-bake oatmeal cookies are the perfect fusion of simplicity and flavor.They require no oven time, which means you can whip up a batch quickly with minimal mess. Plus, the chewy oats paired with rich chocolate and a hint of vanilla offer a comforting taste that feels both wholesome and indulgent.
Q2: What are the essential ingredients for no-bake oatmeal cookies?
A2: The classic base includes rolled oats, cocoa powder, peanut butter, butter, sugar, milk, and vanilla extract. These ingredients come together to create a fudgy, textured cookie that sets as it cools-no baking required!
Q3: Can I customize the recipe?
A3: Absolutely! Feel free to add chopped nuts, shredded coconut, or even a sprinkle of cinnamon for extra zest. You can swap peanut butter for almond or sunflower seed butter if allergies are a concern, or use honey or maple syrup instead of sugar to tweak the sweetness naturally.
Q4: how long do no-bake oatmeal cookies take to set?
A4: After mixing and shaping,these cookies typically firm up within 20 to 30 minutes in the refrigerator. For best results, chill them until they’re fully set, then enjoy their chewy, melt-in-your-mouth goodness.
Q5: Are no-bake oatmeal cookies healthy?
A5: While they do contain sugar and butter, the oats provide fiber and a hearty texture, and using natural nut butters adds protein and healthy fats.You can also make them healthier by reducing sugar or incorporating ingredients like chia seeds or flaxseeds.
Q6: What’s the best way to store these cookies?
A6: Keep your no-bake oatmeal cookies in an airtight container in the refrigerator. They stay fresh for up to a week, making them a convenient grab-and-go snack or a satisfying sweet treat whenever cravings strike.
Q7: Can kids help make these cookies?
A7: Definitely! Since there’s no hot oven involved, no-bake oatmeal cookies are a fun and safe cooking project for kids. They’ll especially enjoy mixing the ingredients and shaping the cookies. Just be mindful when handling hot mixtures on the stove.
Q8: What’s the secret to perfect no-bake oatmeal cookies every time?
A8: The trick is to boil the sugar,milk,butter,and cocoa mixture just right-about one minute-before adding oats and peanut butter. This step ensures the cookies set properly with the ideal chewy texture. Patience during chilling also pays off with perfect firmness.
Q9: Can these cookies be made vegan?
A9: Yes! Use plant-based butter or coconut oil, replace milk with almond or oat milk, and choose a natural sweetener like maple syrup.Vegan nut butters keep the texture creamy and delicious, making these treats suitable for all dietary preferences.
Q10: Why are no-bake oatmeal cookies so popular?
A10: Their popularity stems from ease, speed, and nostalgia. They remind many of childhood kitchen adventures and provide a quick, satisfying snack without heating the house. Plus,their texture and flavor hit that perfect balance between healthy and indulgent. What’s not to love?
Wrapping Up
And there you have it-quick, easy, and irresistibly delicious no-bake oatmeal cookies that fit perfectly into even the busiest of days. Whether you’re craving a sweet snack or need a speedy treat to share, this recipe delivers all the comfort and flavor without turning on the oven. So next time the cookie jar feels a little too empty, remember: a tasty, wholesome delight is just minutes away-no baking required!

Bright Bites: Easy & Fresh Simple Caprese Skewers Recipe
Bright Bites are the perfect way to enjoy the harmonious flavors of fresh mozzarella,ripe tomatoes,and fragrant basil-all elegantly displayed on a skewer for bite-sized delight. This easy & fresh simple Caprese skewers recipe originates from the beloved italian salad but turns it into a visually stunning and portable appetizer. Whether you’re hosting a summer gathering or craving a light snack, these skewers bring freshness and flair to your table with minimal fuss.
Prep and Cook Time
- Planning: 15 minutes
- Cooking: 0 minutes (no cooking required)
- Total Time: 15 minutes
Yield
Approximately 12 skewers (serving 6 as appetizers)
Difficulty Level
Easy – Perfect for beginners and seasoned home cooks alike
Ingredients
- 12 cherry tomatoes, preferably vine-ripened
- 12 fresh mozzarella balls (about 1 inch, bocconcini or ciliegine)
- 24 fresh basil leaves, vibrant and whole
- 2 tablespoons extra virgin olive oil
- 1 tablespoon balsamic glaze (optional but recommended)
- Coarse sea salt and freshly cracked black pepper, to taste
- 12 small bamboo skewers or cocktail picks
Instructions
- Rinse and dry the cherry tomatoes and basil leaves gently with cold water. Pat dry with a paper towel to ensure no excess moisture dilutes flavor or affects presentation.
- Drain the mozzarella balls on paper towels to remove any extra liquid-this helps maintain a firm texture and prevents sogginess.
- Assemble each skewer by threading one cherry tomato, followed by two folded basil leaves (to nestle around the cheese artistically), then a mozzarella ball, and finally ending with another cherry tomato. This layering balances taste and creates a vibrant color contrast.
- Lay the skewers on a serving platter and drizzle with the extra virgin olive oil,ensuring every bite is kissed with richness.
- Optionally, drizzle balsamic glaze over the assembled skewers for a glossy finish and sweet tang that elevates the simple ingredients.
- Sprinkle with sea salt and freshly cracked black pepper just before serving to heighten the natural flavors.
Choosing the Freshest Ingredients for Perfect Caprese Skewers
Nothing elevates Bright Bites like sourcing the freshest ingredients. Look for cherry tomatoes that are brightly colored, firm but tender, and free of blemishes. Fresh mozzarella should be smooth, soft, and moist without cloudiness in its liquid. Basil leaves need to be vividly green, free of browning or wilting, and fragrant when gently rubbed between your fingers. Seek out local farmers markets or specialty stores for peak freshness, or consider growing your own basil for the most aromatic experience. Using ingredients at their prime will result in skewers bursting with authentic Italian flavor and vibrant presentation.
Step-by-Step Guide to Assembling Bright Bites with Flair
Creating these skewers is not just about stacking ingredients-it’s about crafting an edible jewel that invites your guests to indulge at first glance. Begin by folding basil leaves to add volume and prevent bruising once on the skewer. Alternate colors and textures thoughtfully: tomato’s glossy red skin, the mozzarella’s creamy white, and the deep green basil leaves make each skewer a miniature canvas of flavor and beauty. Using small skewers helps portion control and ease of eating at parties. Take your time to drizzle olive oil with a small spoon and the balsamic glaze with a squeeze bottle to create natural,artful streaks rather than heavy pools.
Creative Twists to Elevate Your Simple Caprese Skewers
Bright Bites are wonderfully versatile. Swap cherry tomatoes for heirloom varieties in yellow, orange, and purple to add pops of color and nuanced flavors. use burrata instead of mozzarella for a rich, indulgent bite. For a smoky undertone, lightly char the cherry tomatoes under a broiler before assembling. Incorporate a fresh fruit element like a small cube of ripe peach or watermelon for surprising sweetness. Infuse your olive oil with crushed garlic or chili flakes for a subtle heat that contrasts beautifully with the creamy mozzarella. sprinkle toasted pine nuts or a pinch of flaky sea salt right before serving for an extra textural dimension.
Tips for Serving and Storing Your Caprese Skewers with Ease
Arrange Bright Bites on a flat serving tray lined with fresh basil leaves or rustic parchment paper for an inviting presentation. Serve chilled or at room temperature for optimal flavor. For parties, prepare skewers up to 2 hours ahead-they keep well covered in the refrigerator, but drizzle olive oil and balsamic glaze just before serving to preserve freshness and visual appeal.If storing leftovers, place in an airtight container layered with parchment paper to prevent sticking but consume within 24 hours for best taste and texture.
Chef’s Notes
- Ingredient Substitutions: If fresh mozzarella isn’t available, use high-quality burrata or mozzarella pearls.
- Make Ahead: Skewers can be pre-assembled and refrigerated. Dress them just before serving.
- Flavor Boost: add a sprinkle of fresh cracked black pepper or a pinch of chili flakes for extra zing.
- Presentation Tip: Add edible edible flowers or microgreens for a pop of color and elegance.
Serving Suggestions
Bright Bites pair wonderfully with a chilled glass of crisp Pinot Grigio or a light Italian rosé. Serve alongside a crusty baguette or garlic crostini for a complete appetizer board. Garnish the platter with lemon wedges and extra basil sprigs for freshness and visual appeal. They also make delightful additions to picnic baskets or summer buffets, lending brightness and elegant simplicity to any gathering.
| Nutrient | Per Skewer |
|---|---|
| Calories | 75 kcal |
| Protein | 4 g |
| Carbohydrates | 3 g |
| Fat | 5 g |
Learn more about Caprese salad origins and customary preparation at Serious Eats.
For additional bite-sized Italian appetizers, explore our Easy Italian Appetizers Guide to elevate your entertaining.

Q&A
Q&A: Bright Bites – Easy & Fresh Simple Caprese Skewers Recipe
Q: What are caprese Skewers, and why are they a great appetizer?
A: Caprese skewers are bite-sized, elegant appetizers inspired by the classic Italian Caprese salad. They typically feature fresh cherry tomatoes, creamy mozzarella balls, and fragrant basil leaves threaded onto skewers and drizzled with balsamic glaze or olive oil. These little bites are not only visually stunning with their vibrant red, white, and green colors, but they’re also bursting with fresh, simple flavors. Perfect for parties, picnics, or a light snack, they’re easy to assemble and impress!
Q: What ingredients do I need to make Simple Caprese Skewers?
A: You’ll need a handful of fresh ingredients:
- Cherry tomatoes (bright and juicy)
- Mini mozzarella balls (bocconcini or ciliegine)
- Fresh basil leaves
- Extra virgin olive oil
- Balsamic glaze or reduction
- Salt and freshly cracked black pepper (optional)
That’s it! Just a few staples that together create a fresh and flavorful bite.
Q: How do I assemble the skewers for the best presentation and taste?
A: Start with threading one cherry tomato onto a small wooden skewer or toothpick, then add a basil leaf-folded if large-followed by a mozzarella ball. You can repeat the pattern for longer skewers or keep them simple with one set per stick. Arrange them on a platter in neat rows or a colorful cluster. Right before serving, drizzle generously with olive oil and balsamic glaze. A sprinkle of sea salt and freshly cracked pepper elevates the flavors beautifully.
Q: Can I customize or add variety to this recipe?
A: Absolutely! The beauty of Caprese Skewers is their versatility. Try adding:
- A slice of avocado for creaminess
- A small piece of prosciutto for a salty twist
- A hint of fresh lemon zest for brightness
- A sprinkle of chili flakes for a subtle kick
You can also experiment with flavored balsamic glazes or swap out mozzarella for feta if you like a tangier flavor.
Q: How should I store Caprese Skewers if I prepare them ahead of time?
A: Freshness is key! It’s best to assemble them a few hours before serving and keep them refrigerated in an airtight container. Add the olive oil and balsamic drizzle just before serving, so they don’t get soggy. If making more than a few hours ahead isn’t possible,you can prep the ingredients separately and quickly assemble right before your event.
Q: Are Caprese Skewers suitable for special diets?
A: Yes! They’re naturally vegetarian and gluten-free, making them an excellent option for many dietary preferences. For a vegan twist, substitute mozzarella with a plant-based cheese or marinated tofu cubes.
Q: What makes this Caprese Skewers recipe “bright” and “fresh”?
A: The secret is in the high-quality, fresh ingredients-ripe, juicy tomatoes, fragrant herbaceous basil, and creamy-smooth mozzarella. The bright colors mirror the vibrant flavors and the simplicity of preparation keeps the ingredients shining rather than masked.The drizzle of tangy balsamic glaze ties everything together with a glossy finish that invites you to take a bite.
Q: Any tips for serving these at a gathering?
A: Serve your Caprese Skewers chilled on a decorative platter with extra balsamic glaze and olive oil on the side for guests to add more if they like.Pair them with crusty bread and olives for a light Mediterranean spread. They’re also fantastic alongside grilled meats or as a refreshing break between heavier dishes. Their portability makes them perfect for buffet tables or passed hors d’oeuvres.
Bright, fresh, and irresistibly simple-these Caprese Skewers are guaranteed to brighten your table and delight your taste buds!
Key Takeaways
Bright Bites: Easy & Fresh Simple Caprese Skewers Recipe wraps up as a delightful party of fresh flavors and effortless elegance.Whether you’re hosting a casual get-together or craving a vibrant snack, these skewers marry the juicy sweetness of ripe tomatoes, creamy mozzarella, and fragrant basil in a bite-sized masterpiece. Simple to assemble and visually stunning, they prove that sophistication doesn’t have to be complicated. So next time you want to brighten your table with a burst of color and taste, reach for this recipe and let fresh ingredients do the talking-because sometimes, the simplest bites shine the brightest.
