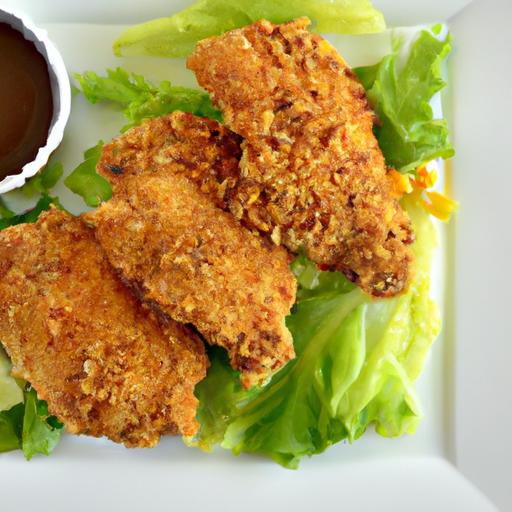

There’s something undeniably magical about biting into a piece of chicken that boasts an irresistibly crispy, golden crust-one that crackles beneath your teeth and gives way to tender, juicy meat inside. Enter the world of panko-crusted chicken, where ordinary breading is transformed into an unusual crunchy experience. But mastering this art isn’t just about tossing chicken in breadcrumbs; it’s a delicate dance of technique, temperature, and timing that elevates your dish from simple comfort food to a culinary masterpiece. In this article, we’ll unravel the secrets behind achieving that perfect extra crunchy panko crust, guiding you step-by-step to chicken perfection that will wow your taste buds and impress every time.
Mastering extra Crunchy Panko-Crusted Chicken Perfection is not just about following a recipe-it’s an art balanced with essential science that transforms simple chicken into a golden,irresistibly crispy masterpiece. Understanding the role of each ingredient and technique unlocks that coveted crunch and the perfect texture that makes every bite a delight.
The Science Behind Achieving Ultimate Crunch with Panko
Panko breadcrumbs differ from traditional breadcrumbs by their flaky, airy texture, which creates pockets of crispiness rather than a dense coating.Selecting high-quality panko-preferably Japanese-style, which offers larger flakes-helps maximize surface area that crisps up beautifully when fried or baked. Their unique composition allows hot oil or oven heat to penetrate without weighing down the crust, producing a lighter, crunchier coating.
Selecting the Best Ingredients for Crispy Chicken Excellence
Start with fresh, skinless, and evenly cut chicken breasts or thighs, pounded to a uniform thickness for even cooking. The coating trio is crucial: sifted all-purpose flour to absorb moisture and create a dry surface, beaten eggs bound the panko, and the panko itself provides the texture. Adding a pinch of cornstarch to the flour enhances crispiness by reducing moisture absorption even further.
Techniques to Ensure Even Coating and Maximum Crispiness
Patting the chicken dry and using a three-step breading process-flour, egg, then panko-ensures a consistent coating that adheres well and fries evenly. Press the panko firmly onto the chicken without crushing the flakes to retain that signature crunch. Resting the breaded chicken on a wire rack for 10 minutes before cooking helps the coating set,further preventing it from falling off.
Mastering the perfect Frying and Baking Times for Golden Results
When frying, maintain the oil temperature between 325°F and 350°F (163°C-177°C). Too low, and the panko absorbs excess oil becoming soggy; too hot, and the crust browns too quickly before the inside is cooked. Shallow frying for 3-4 minutes per side produces golden crispiness without greasiness. For baking, preheat the oven to 425°F (220°C) and bake the coated chicken on a greased wire rack for 20-25 minutes, flipping halfway, to achieve similar crunch with less oil and a lighter finish.
Prep and Cook Time
- Preparation: 20 minutes
- Cooking (frying or baking): 15-25 minutes
- Total Time: 35-45 minutes
Yield
Serves 4 hungry guests, perfect for family dinners or impressive weeknight meals.
Difficulty Level
Medium – perfect for home cooks ready to elevate their technique and wow with crunchy, flavorful chicken.
Ingredients
- 4 boneless, skinless chicken breasts (pounded to 1/2-inch thickness)
- 1 cup all-purpose flour, sifted
- 1 tablespoon cornstarch
- 2 large eggs, beaten
- 2 cups Japanese-style panko breadcrumbs
- 1 teaspoon smoked paprika
- 1 teaspoon garlic powder
- 1 teaspoon kosher salt
- 1/2 teaspoon freshly ground black pepper
- Vegetable oil for frying or an olive oil spray for baking
Instructions
- Prepare the chicken: Pat each breast dry and season both sides with salt, pepper, paprika, and garlic powder for a flavorful crust.
- Set up breading station: In one shallow bowl, combine flour and cornstarch. In a second bowl, beat the eggs. In a third, place the panko breadcrumbs.
- Bread the chicken: Dredge each piece in the flour mixture, shaking off excess. Dip into the egg, coating fully. press into panko, making sure the flakes adhere without smashing.
- Rest before cooking: Place the coated chicken on a wire rack for 10 minutes. This step helps the breading stick better and promotes an even crust.
- Frying method: Heat vegetable oil in a large skillet over medium-high heat to 340°F. Fry chicken pieces 3-4 minutes per side or until golden brown and internal temperature reaches 165°F. Drain on paper towels to remove excess oil.
- Baking method: Preheat oven to 425°F. Lightly spray a wire rack set over a baking sheet with olive oil. Arrange chicken on the rack and spray tops with olive oil. Bake 20-25 minutes, turning once halfway through until crisp and cooked through.
- Rest and serve: Let the chicken rest for 5 minutes before slicing to maintain juiciness.
Tips for Success
- Variation: Swap paprika for Cajun seasoning or add Parmesan cheese to the panko for an extra savory twist.
- Substitution: Use ground turkey breasts or firm tofu for a lighter option.
- Troubleshooting: If the crust falls off, ensure the chicken is well dried and apply gentle but firm pressure when pressing the panko.
- Make-ahead: Bread the chicken and refrigerate up to 2 hours before cooking to deepen flavors and improve coating adhesion.
Serving Suggestions
Plate your crisp chicken alongside a fresh arugula salad tossed with lemon vinaigrette for a bright contrast. Garnish with finely chopped parsley and serve with creamy mashed potatoes or a tangy dipping sauce, such as garlic aioli or a honey mustard glaze, to elevate the flavor and texture experience.

| Nutrient | Per Serving |
|---|---|
| Calories | 320 kcal |
| Protein | 38 g |
| Carbohydrates | 18 g |
| Fat | 9 g |
For more inspiration on crispy chicken dishes, check out our Crispy Chicken Thigh Recipes. to dive deeper into the science of frying, visit the Serious Eats guide on frying.
Q&A
Q&A: Mastering Extra crunchy Panko-Crusted Chicken Perfection
Q: What makes panko breadcrumbs different from regular breadcrumbs?
A: Panko breadcrumbs are flaky, airy, and larger in texture compared to traditional breadcrumbs. They create a lighter, crispier crust that stays crunchier longer, giving your chicken that irresistible crunch every bite should have.Q: How do I achieve that ultra-crispy, golden crust on my panko chicken?
A: The secret lies in a few key steps: frist, pat your chicken dry to avoid sogginess. Next, lightly dredge it in seasoned flour, then dip it in beaten egg to help the panko stick. press the panko firmly onto the chicken for an even coating. Fry in hot oil at around 350°F (175°C), turning carefully until golden brown and crispy.
Q: Can I bake panko-crusted chicken instead of frying it?
A: Absolutely! For a healthier twist, bake your breaded chicken on a wire rack set over a baking sheet. This allows air to circulate and the heat to crisp all sides. Spritz lightly with oil or use a brush to ensure that signature golden crunch.Q: How do I season panko breadcrumbs to elevate flavor?
A: Mix in spices and herbs like garlic powder, smoked paprika, parmesan cheese, chopped fresh parsley, or even a pinch of cayenne. Thes add layers of flavor beneath that crispy exterior, turning simple chicken into a taste sensation.
Q: What cut of chicken works best for panko crusting?
A: Thin, even cuts like chicken tenders or flattened boneless breasts cook evenly and quickly, helping the crust stay intact and maintain crunch without drying out the meat.
Q: Why is pressing the panko onto the chicken crucial?
A: Pressing the breadcrumbs ensures a sturdy, uniform coating that won’t fall off during cooking. This technique is key for creating that perfect extra crunchy crust that’s both satisfying and delicious.
Q: How can I keep my panko chicken crispy after cooking?
A: Avoid stacking the pieces; instead, place them on a cooling rack.If not serving immediately, keep warm in a low oven (about 200°F/95°C) on a wire rack to retain crunch.
Q: Any tips for troubleshooting soggy or uneven crust?
A: If your crust turns soggy, your oil might potentially be too cool – hotter oil is essential to seal the coating quickly. Also, avoid overcrowding the pan which lowers oil temperature and causes steaming. Lastly, ensure the chicken skin or surface is dry before breading.With these insider tips and a pinch of patience, your journey to extra crunchy panko-crusted chicken perfection is just a crispy bite away!
In Conclusion
As you close the chapter on your quest for the ultimate extra crunchy panko-crusted chicken, remember that mastery lies not just in the recipe but in the dance of technique and patience. Each golden, crispy bite is a testament to the harmony of precise seasoning, flawless breading, and the perfect sizzle. With these insights in hand, you’re no longer just cooking-you’re crafting a crispy masterpiece that elevates the humble chicken to extraordinary heights. So go ahead, wield your panko with confidence, and let every crunch tell the story of your newfound culinary prowess.